高可用性のセットアップ
※高可用性の機能は日本法人で保守サポート対象外です
データベースと DataEngine の構成
PostgreSQL データベース
- プライマリ サーバーの pgsql フォルダ (<Product_home\pgsql) の内容をコピーし、データベース サーバーに貼り付けます。
- データベース サーバーで、ディレクトリ <pg_home>\bin でコマンド プロンプトを管理者として開き、次のコマンドを実行してデータベース サービスを登録します。
- 次のエントリを追加して、<pg_home>\data にある postgresql.conf ファイルを変更します。
- 次のエントリを追加して、<pg_home>\data にある pg_hba.conf ファイルを変更します。
- データベース サーバー上で ManageEngine ADAudit Plus - データベース サービスを開始します。
- プライマリ サーバーとスタンバイ サーバーの両方で、次の行の localhost をデータベース サーバー名/IP アドレスに置き換えて、<Product_home>\conf にある database_params.conf ファイルを変更します。
pg_ctl.exe register -N "ManageEngine ADAudit Plus - Database" -D ..\data -S demand
listen_addresses = '*'
host all all 127.0.0.1/32 md5
host all all <DB Server ip addr >/32 md5
host all all <Primary Server ip addr>/32 md5
host all all <Standby Server IP addr>/32 md5
host all all <Public ip addr>/32 md5
url=jdbc:postgresql://localhost:33307/adap
Microsoft SQLサーバーデータベース
- プライマリ サーバーの <Product_home>\conf にある database_params.conf ファイルをコピーし、スタンバイ サーバーの <Product_home>\conf に貼り付けます。
DataEngine
- 必要なフォルダーを取得するため、弊社サポートにお問い合わせください。
- 弊社サポートより取得したフォルダーを解凍し、ディレクトリ <DataEngine home>\bin で管理者としてコマンド プロンプトを開き、バッチ ファイル Unpack.bat を実行します。
- 次のコマンドを実行して、DataEngine サービスをインストールします。
- プライマリ サーバーの <Product_home>\apps\dataengine_xnode にある data フォルダと db フォルダをコピーし、DataEngine サーバーの <DataEngine_home> に貼り付けます。
- プライマリ サーバーとスタンバイ サーバーの両方で、次に示すようにサーバー名を追加し、ローカルをリモートに置き換えることにより、conf\DataEngine\engines\xnode にある dataengine-xnodes.conf ファイルを変更します。
- DataEngine サーバーで、以下のキーを追加してリモート リクエスト処理を有効にし、apps\dataengine-xnode\conf にある dataengine-xnode.conf ファイルを変更します。
- プライマリ サーバーで、conf\DataEngine\engines\xnode にある dataengine-xnodes.conf ファイルから xnode.connector.password 値をコピーします。この値を、DataEngine サーバーの apps\dataengine-xnode\conf にある dataengine-xnode.conf ファイルと、スタンバイ サーバーの conf\DataEngine\engines\xnode にある dataengine-xnodes.conf ファイルに貼り付けます。
- プライマリ サーバーとスタンバイ サーバーの両方で、次に示すようにサーバー名を追加して、conf\DataEngine\xnode\datarepository にある datarepositories.conf ファイルを変更します。
- ManageEngine ADAudit Plus - DateEngine サービスを開始します。
wrapper.exe -i ..\conf\wrapper.conf
xnode.host = <DataEngine server name>
xnode.location = remote
xnode.connector.accept_remote_request=true
xnodes = <DataEngine server name>
製品構成
- PostgreSQL の場合はデータベースサーバー上でデータベースサービスを起動します。
- プライマリ サーバーで ADAudit Plus サービスを開始します。
- クエリを実行するには、次の手順に従います。
- プライマリ サーバーで、ADAudit Plus Web コンソールにログインします。
- [サポート]タブに移動し、[サポート情報]タイルで[詳細]をクリックします。
- [ADAuditPlus DB クエリ]セクションで、次のクエリを実行します。
select max(config_id) from adshaconfigurationPostgreSQL の場合:
insert into adshaconfiguration values (<value from query1 + 1>, 3, '<primary server name>', '<standby server name>', 'Postgres', '<public ip>', '', '', null)
Microsoft SQL の場合:
insert into adshaconfiguration values (<value from query1 + 1>, 3, '<primary server name>', '<standby server name>', 'mssql', '<public ip>', '', '', null)
- プライマリ サーバーとスタンバイ サーバーの両方で、ifcheck.exe、iflist.exe、ipadd.exe、および ipdel.exe ファイルを <Product_home>\tools\fos\bin からコピーし、<Product_home>\bin に貼り付けます。
- プライマリ サーバーとスタンバイ サーバーの両方で、<Product_home>\tools\fos から fos.conf ファイルをコピーし、<Product_home>\conf に貼り付けて、IP プロパティと共有名を次のように変更します。
- プライマリ サーバーとスタンバイ サーバーの両方で、次のエントリを追加して、<Product_home>\conf にある wrapper.conf ファイルを変更します。
- プライマリ サーバーとスタンバイ サーバーの両方で、<Product_home>\tools\fos\conf から module-startstop-processors.xml ファイルをコピーし、<Product_home>\conf\Persistence に貼り付けます。
- プライマリ サーバーとスタンバイ サーバーの両方で、次のエントリを追加して、<Product_home>\conf にある customer-config.xml ファイルを変更します。
- プライマリ サーバーとスタンバイ サーバーの両方で、以下のエントリを変更して、<Product_home>\conf\product_detail.conf にある product_detail.conf ファイルを変更します。
- 両方のインスタンスで製品インストール フォルダの名前を MEADAP に変更し、両方のインスタンスとデータベース サーバーのマシン アカウントにフル コントロールのアクセス許可を割り当てます。
- 以下の図に示すように、両方のインスタンスの製品インストールを共有し、3 つのマシン アカウントすべてに共有権限を付与します。
#IP address properties
#Server specific - ipconfig を使用してIPアドレスを検索します
ipaddr=<ip4 address>
#Server specific - iflist.exe を実行して、結果からの[アダプター名]を使用します
publicIP.Ifname=<Adapter Name>
#Server specific - ipconfig を使用してサブネットマスクを見つけます
publicIP.netmask=<subnet mask>
#Common IP for HA。静的 IP である必要があります
publicIP.ipaddr=<common IP address>
#Name of the share
repl.remoteinstallationDir=
wrapper.event.wrapper_stop.command.argv.1=..\bin\ipdel.exe
wrapper.event.wrapper_stop.command.argv.2=<value of public IP to be unbound>
wrapper.event.wrapper_stop.command.block=TRUE
#wrapper.event.wrapper_stop.command.block.timeout=20
wrapper.event.wrapper_stop.command.on_exit.0=CONTINUE
wrapper.event.wrapper_stop.command.on_exit.default=CONTINUE
<configuration name="VersionHandler"
value="com.manageengine.ads.fw.ha.HAVersionHandler"/>
<configuration name="StartDBServer" value="false"/>
IS_HA_ENABLED=true
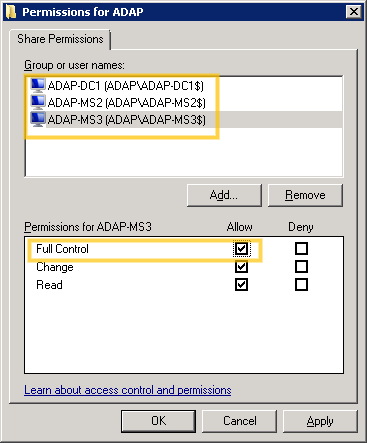
注記:ここで、ADAP-DC1 はデータベース サーバー、ADAP-MS2 はプライマリ サーバー、ADAP-MS3 はスタンバイ サーバーです。